Sunday, December 14, 2014

Mosstack 0.6.1 released!

I didn't even have time to write a release post about 0.6 when already I was reported a bug that prevented loading anything but Canon's raw photos. That was fixed in 0.6.1 and now the release announcement:

Mosstack 0.6.1

What's new? As already posted in http://mikkolaine.blogspot.fi/2014/11/mosstack-06-release-candidate-1.html there's quite a lot of changes. Here's a short list:
  • Manual. Written in LaTeX since I plan to include explanation of all the math here as well. For now it's only manual for the command line interface. Manual is included in distribution package.
  • Speedup for OpenCL operations. (Actually I have no idea about this. Just noticed during tests that what used to take 5 seconds, takes now only 0.5 seconds. I don't know who or what to thank.)
  • Cropping before stacking. Works on both GUI and CLI. This reduces amount of required memory and makes stacking a lot faster.
  • Added support for any images DCRaw can open. There's only one Bayer filter programmed (RGGB) so any other images work only as monochrome. This should be enough for most consumer DSLR cameras.
  • Better project management. Removing frames from project, selecting the reference frame, clean command to remove temporary files...
  • Adding premade master frame so creating the calibration frames isn't necessary for several image sets from same photo session.
  • Giving "Bias level" instead of master bias is possible from command line. This subtracts given number from every pixel on each frame.
  • Maximum and Minimum stacks. Partially for testing, but I guess there might be uses for these.
  • Kappa can be defined for Sigma methods. Sigma methods reject or replace values that differ amount of κ*σ (κ defaults to 3.0 and σ is standard deviation) from the median.

Web page

Until now everything has been on BitBucket, but that's not the easiest media to share tutorials or such. I also applied an open source license of PyCharm (and got it too!) and that required the open source software in question to have a proper web page. Hence: https://sites.google.com/site/mosstack

How to get:

Monday, November 3, 2014

Mosstack 0.6 Release Candidate 1

This was supposed to be a quite small version bump. Originally the plans were to add a couple of stacking methods, trim the math, and fix setting the reference frame (so that cropping would some day be possible)... The some changes required quite a lot of rewrite under the hood and suddenly there was a huge update coming.

According to CLOC there is almost 1000 lines of new code compared to version 0.5.2, with the sum being almost 6000. That's Python and Cython code lines. Comment lines, blank lines and C generated from Cython are not included.

Download release candidate from https://bitbucket.org/mikko_laine/pyastrostack/downloads. Ubuntu, Debian and Gentoo packages will be done for the final version.

Highlights from changes:

Crop window
  • Cropping before stacking. Set reference image and set crop area from Gui by rectangle selection and the images are cropped after preprocessing. This reduces amount of required memory and makes stacking a lot faster.
    Cropping also works on command line, but requires giving coordinates manually.
  • Added support for any images DCRaw can open. There's only one Bayer filter programmed (RGGB) so any other images work only as monochrome. This should be enough for most consumer DSLR cameras.
  • Removing frames from project works on Gui and Cli
  • Adding premade master frame so creating the calibration frames isn't necessary for several image sets from same photo session.
  • Giving "Bias level" instead of master bias is possible from command line. This subtracts given number from every pixel on each frame.
  • Maximum and Minimum stacks. Partially for testing, but I guess there might be uses for these.
  • Kappa can be defined for Sigma methods. Sigma methods reject or replace values that differ amount of κ*σ (κ defaults to 3.0 and σ is standard deviation) from the median.
  • Added size and clean commands to Cli. These report the size of temporary files of a project and delete everything except master frames.
  • ImageMagick affine transformations are disabled. Code still exists, but isn't supported at least at the moment.

What's still to be done before 0.6:

  • Documenting. Both the code itself and also how to use the program. I started a manual written with LaTeX but there will also be a website.
  • Debugging. I'm quite sure there are quite a lot of bugs left in the code
  • Cleanup. Old names AstroStack and pyAstroStack are still everywhere in the code. I plan to change all those and rename some files in the process. Also huge chunks of code is now "documented out" with # or triple quotes. Delete all that. Leave only what's required.

Saturday, October 18, 2014

Triangulum Galaxy and other shots from September 30th

I failed at shooting the Triangulum Galaxy the last time, but now I had a bit better conditions. Seems like the 150 second exposures before were result of a extreme luck with alignment. This time even 120 s seemed to trail a bit but 100 second worked.


Here's 10x100 seconds stacked with Mosstack. Full photo in https://flic.kr/p/pHia6c and Astrobin entry here http://www.astrobin.com/129577/. Seems like focus was off. I adjusted it after this stack so the rest objects are more sharp.

I'm actually a bit surprised to get that much color on the photo. Stacking with IRIS gives even more blue, but I'm trying to process all my photos with my own stacker. I use IRIS for comparison only. Here's what IRIS was able to do.

Post processing is done with Darktable so full processing with open source software only.

Something more...

I took couple of shots at Pleiades just to see if I can get any nebula visible. 


There indeed is some and it's blue. There always could be more so more photo sessions required with this object. Full photo here https://flic.kr/p/pr8VMw and Astrobin entry here http://www.astrobin.com/129580/.

And now something without any nebulosity: the Double Cluster.


I had shot this one before as well and my idea was to compare these two to see the development of my gear and me. The previous photo is here and full version of the new here.

Monday, September 15, 2014

Dumbbell nebula, Ring nebula and exposure tests

The sky was clear on September 13th and I planned to shoot some stars before Moon rises. I thought I had prepared everything, but turned out I hadn't charged cameras battery. Luckily there was enough power to last until Moon lit up the sky. Maybe 15 minutes more had been possible but nevertheless... everything went better than I expected.

First some more tests about exposure times. 80 second was easily possible the last time, now I tried some more.

100 second exposure (left) and 150 second exposure (right)
100 seconds looked good so I took 150 second. When I look at the photo on computer screen I'm not sure about 150s. Most stars look ok, but maybe some show some trailing. I have to run final tests about this on a better ground. This time the mount was a bit unstable. So I'm not sure whether the trail is caused by mount shifting on ground or incorrect alignment.

Result was something between 100 and 150 seconds so I chose 120 as exposure time for shooting the Triangulum Galaxy.

Triangulum Galaxy M33


This failed. Moon was rising and it's glow had lit the eastern sky. Air humidity was also quite high and some fog did form a while later so all that made Triangulum a wrong target for that night. Still I spent 10 x 120 seconds worth of time and battery on what you see above. Also I managed to tilt the camera couple times so only seven photos were usable.

Well... You can see it and maybe even recognize it as M33. Bigger photo (if really necessary) in https://www.flickr.com/photos/96700120@N06/15063242487/

Ring nebula M57

After the Triangulum failure, I realized the sky was more clear of light pollution right in zenith. Lyra and Ring nebula was the first thing that came in mind. Couple of photos there and only one of them was not tilted during exposure. I really have to stay away from the mount during shooting...


This is a single 120 second exposure. Quite nice. Although focal length of 200 mm is quite short for M57. Bigger photo in https://www.flickr.com/photos/96700120@N06/15063241107/

Dumbbell Nebula M27

Battery indicator was blinking red but I thought I'd use all the remaining power to shoot the Dumbbell nebula. It was also in a dark spot of the sky. Now the exposures are only 30 second and I took 10 of them but still this is what I got:


I'm impressed. Last time I tried M27 was with my old 75-300/4-5.6 zoom lens. I got a faint gray smugde. Now the aperture was 2.8 and my faint smudge has some real color! Can't wait to take some longer exposures of this.

Here's one a bit zoomed to show in the preview on Facebook or G+. :)


Bigger photo in https://www.flickr.com/photos/96700120@N06/15048413067/ and one with more stars around it in https://www.flickr.com/photos/96700120@N06/15047931927/. There's also open cluster of NCG6830 on the bottom if this image.

Tuesday, September 9, 2014

Proper alignment of EQ3-2 and first photos of the season

I've had problems with aligning the EQ3-2 even though I have a polar scope. For some reason I misunderstood the instructions totally. I always assumed the scope shows some kind of fish eye view and the constellations visible should cover the real stars. Nope.

View from polar scope. Image linked from
http://stargazerslounge.com/topic/158612-is-there-an-eq5-pro-synscan-goto-manual/#entry1602579
The scope shows Big Dipper and Cassiopeia from northern hemisphere and Octans from the south. Place polaris here circle is exactly as it says, but the rest are just directions where the constellation should be. This was the information I was lacking.

Now I made a somewhat good alignment and started to look through the scope. Polaris was by chance quite close to the circle. With couple of minutes of screwing and unscrewing the legs I got Polaris right where it should be. Now the tests...

With rough alingment I got maybe 20 second exposures with 200 mm optics without the stars trailing. Once or twice 25 to 30 seconds was possible close to celestial pole. Now I tried 30 s, 45 s, 60 s, 70 s and when that worked I took 20 exposures with 80 second time.


Here's an single shot to how the stars don't trail with 80 second exposure.

The Moon was up and almost half so sky was kind of lit. Before this it has never bothered me too much since my exposures were so short, but now it was a problem. I tried to stack my Andromeda photos and the result was worse than my previous best one (with 25s exposures). There's really no point of posting that image here.

After Andromeda photos were shot I decided to try the Whirpool galaxy. I knew the Moon makes that difficult so the result won't be good. Before this I haven't had any image of it. Now I got this


From nothing to this. Now I'll just wait for a better conditions (no Moon) and try again.

Sunday, August 24, 2014

Mosstack 0.5 - Mikko's Open Source Stacker for astronomical images

Finally a new version and a new unimaginative name.

What's new?

  • Name! PyAstroStack was only a temporary name I came up with when I created a directory for the source code. The py prefix and camel case started to annoy me so I wanted to change it now.
  • Multithreading in Gui. Most operations can run in parallel utilizing more than one core from CPU
  • Settings in Gui. Command line is not required anymore, but I'm not going to drop it.
  • Icon and shortcut in your desktop environments menu
  • Packages for Debian Jessie and Sid
  • Lot of changes under the hood making mosstack a lot stable than the older versions.
You can get the program from https://bitbucket.org/mikko_laine/pyastrostack/downloads. On Ubuntu I suggest using the ppa archive:

sudo add-apt-repository ppa:mikko-laine/pyastrostack

The repository is still under the old name. After this update sources and install package mosstack.

Next I'll start working on some kind of a manual. If you're familiar with the stacking process (know lights, darks, flats and biases) the program should be quite straightforward to use.

Friday, August 22, 2014

AstroStack: Closing on 0.5 release and roadmap to future releases

No, there's no new name. I didn't come up with anything. The name is now AstroStack and executable is astrostack with no CamelCase. I'll also change distribution package names and Gentoo and Ubuntu releases to lowercase.

Since there's a graphical user interface now I thought it would be nice to have an icon as well. I'm not sure if my graphic skills even match my coding skills, but here it is:
I'm also including a .desktop file so AstroStack will be found in the menu of desktop environments that support these files. My understanding is that they all should.

A release candidate (RC3) is already uploaded in BitBucket and Launchpad. The program itself is working fine on RC3 (at least it seems so...), but lacks documentation, .desktop file has some problems and the icons are in wrong format. I hope I have enough time to finalize this on the weekend. Now that I go to work again after one year of child care leave, my time on this project is more limited.

Roadmap to future releases:

Some planned features:

0.6

  • A manual
  • Frame information table on Gui. There's already a place holder for it but no functionality. Click a frame from the list and this should show all the extracted info.
  • Have command line interface use the same methods on class Frame the Gui uses
  • Setting for choosing memory limits for stacking. I have no idea how to limit by megabytes, but I can choose how many pieces the stack is split into. This could somehow depend on the setting.

0.7 or later

  • Show frame when clicked. Maybe as a pop up window.
  • Choose the reference frame which the rest are aligned to.
  • Choose cropping from the reference frame. This will save a lot of time and memory during the stacking process.

Wednesday, August 6, 2014

Problem of giving a name for software

PyAstroStack was supposed to be a temporary name I gave to the directory holding the code. I planned to change that before uploading anything to a public repository. Then after 0.1 I decided 0.2 is going to have a proper name, but no...

Now I'm planning the same for 0.5. I'm also planning on moving the public repo from BitBucket to Github so the name should be decided before that. I'm just out of ideas.

What do I want from the name?

The most important thing is simplicity of writing it. Even with Bash's autocomplete with tab, difficult commands are a pain to type. The current name is quite good from this point of view but I have to drop the capitals from command names. What was I thinking when I named the executable "AstroStack"?

Secondly I'd like the name to be relevant in some way. The program stacks astronomical images, yes, current name seems to work here as well. I've been thinking names of star constellations, nebulae, galaxies and so on, but haven't found anything sufficient. Different versions are currently being named after constellations. 0.2 was Andromeda, 0.4 was Orion and 0.5 is Cassiopeia. This name is only visible at the git branch at the moment, but maybe I'll put it in a more visible place in the future.

Third thing is, I don't want the name to be boring like pyAstroStack. I've been thinking an acronym, like so many other open source software have, but I lack the imagination for this. Also the acronym should form some relevant word.

Maybe I'm too stuck with the word stacker. All my ideas seem to include that. I should try something completely different. Or maybe I'll stick with this after all. In that case I'll drop the py prefix.

Any ideas?

Thursday, July 31, 2014

pyAstroStack: Multithreading vision and status

The GUI of pyAstroStack works reasonably well (for such a limited gui that is...) in version 0.4, but my original plan was a little different. Now that I have time to code again after summer, I'm finally getting my vision to work.

Here's a screenshot of current 0.5dev


Vision

I want the list of files to be more interactive. First column shows the file path, second is frame type, but the rest are what I'm working on. Decoded means reading the RAW file and decoding it to FITS. Numbers 0, 1 and 2 are place holders for "Not started", "Working..." and "Done". I'm not sure if I want some kind of icons or rolling animations there, but for now only the place holders.

The moment you select some images and click OK, the program starts decoding them on background. Gui will be responsive all this time and you can select more files while it's working. You can also set parameters for full process while it's working on background.

Status

My problem was that even I had multithreading set up, the gui stayed unresponsive and didn't update. I searched and read lots of tutorials and stackoverflow questions, but no help. Finally I found it! I had

threadpool = QThreadPool()

but instead it should have threadpools parent as an argument. I changed it into

threadpool = QThreadPool(self)

and everything started working. This might be obvious for more experienced PyQt programmers, so I can understand why no tutorial emphasized the importance of it. Maybe now I remember that all QWidgets require the parent as an argument.

Decoding works with 5 simultaneous threads, but with 10 there are random errors. I wonder if the threads are trying to use same files at the same time. If so, it has to be fixed. The rest of the program is currently broken (on 0.5dev, on 0.4.1 it works of course) because I had to do significant changes to the frame handling to get multithreading to work.

Thursday, April 17, 2014

PyAstroStack: Now with easier installation for Ubuntu 14.04 and Gentoo

Installing with python setup.py install is fairly easy but taking care of the dependencies can sometimes be ugly. I always wanted this program to be easy to install and now that's happening; for Gentoo and newest Ubuntu 14.04.


Gentoo: Science overlay

Most Gentoo users are familiar with layman, overlays and unmasking masked packages. For most, that's the reason to use Gentoo. Easy installation for almost everything. Stuff that isn't on Portage tree can be added for easy emerge with overlays and layman takes care of them. I wrote an ebuild for pyAstroStack and it was accepted in the science overlay.

If you're not that familiar with all that, this will probably help:

# emerge layman
# layman -a science
# emerge --autounmask-write -v pyAstroStack
# dispatch-conf
# emerge pyAstroStack

The --autounmask-write creates unmasking configurations and dispatch-conf or etc-update integrates them into /etc. This will install Python 2 and/or Python 3 versions according to your PYTHON_TARGETS variable in /etc/portage/make.conf.

Ubuntu 14.04

I know there's Launchpad and apt-repository for community packages but I'm not there yet. Maybe soon, but for now there's only a .deb file to download and install.

Download pyastrostack_0.3.0-3_amd64.deb from https://bitbucket.org/mikko_laine/pyastrostack/downloads and

# sudo dpkg -i pyastrostack_0.3.0-3_amd64.deb
# sudo apt-get -f install

First line will mark the package to install but the installation will fail due to missing dependencies. Second line fixes all that and installs everything required including the software itself.

Other Linux distributions

Of course I'd like to support everything. The .deb I made does not necessarily require Ubuntu so it most likely will work on Mint and other Ubuntu derivatives. It also might work on Debian, but that's more uncertain. Debian specific package will be ready in near future.

Python's distutils support creating RPM's but I haven't tested those at all so I will not distribute them.

For everything else I recommend the python setup.py install line and manual installation of all the dependencies.

Tuesday, April 8, 2014

pyAstroStack 0.3.0 - Lots of speedups and OpenCL no longer required

I released 0.2.1 just about a week ago and now I'm about to push 0.2.5 out. First the updates were indeed minor, but they grew and became quite important considering the whole program. After finishing 0.2.5 and hunting down its bugs I decided this version should be 0.3.0 instead.

Installation still requires Python-pip on Ubuntu 13.10, but I'm already targeting this on soon to be released 14.04. There might even be a deb-package or repository on Launchpad if I figure them out.

Here's a summary of changes:

  • Bilinear and Variable Number of Gradients (VNG ) debayering algorithms. This makes PyOpenCL not required. With OpenCL the methods are a bit faster but the difference is about 10-20%.
  • PyAstroStack will work on Ubuntu 14.04 without too much hassle. There are a lot of packages to install but everything seems to be on package manager.
  • Fixed a huge memory leak on registering operations.
  • Registering speedups on 
    • correctly Cythonizing _step2.pyx
    • changing ImageMagick to Scikit-image
    • not requiring SExtractor and star matching if registering (aligning) same batch again
Full list of changes in distribution package on in Git repository.


Prints from AstroStack

Saturday, March 29, 2014

pyAstroStack 0.2.1 - Now it might even work!

Should I say it once more? I really don't have experience on working with any programming projects this big. I seem to learn everything the hard way. Before releasing the first alpha, the biggest problems were with writing the user interface. Something I've never done properly. Everything has been my own little programs so I always could edit the source. No need for UI then...

But even that was something I just needed to work on. After 0.1.0 it came to my knowledge that the program is too difficult to install. Not pyAstroStack itself but its requirements. Some libraries I used were on Gentoo's Portage, which I use for coding and testing, but they're missing even on Ubuntu or Debian. That could be circumvented with Pip. A bigger problem was OpenCl. My debayering algorithms rely on pyOpenCl and the program is quite useless without it. On Gentoo it worked if I had just the right version of Nvidia drivers, but on Ubuntu it didn't. It was possible to hack it working, but I'd rather have it easier.

On Ubuntu 14.04 things seem to work better. I haven't tested everything yet but at least OpenCl works after installing Nvidia's proprietary drivers.

Version 0.2 doesn't have any new features. There are rewritten classes, some speed improvement, things work a lot differently under the hood... Most changes were preparing to write a graphical user interface. I've chosen PySide with QML for implementing it. Now I just have to learn how to write QML. :)

Here's a link once more to download pyAstroStack: PyAstroStack on BitBucket


Saturday, February 22, 2014

pyAstroStack: First alpha release!

First I have to say that this project was a lot bigger than I thought. Even on the limited functionality it has now there was a lot more work I was prepared to. And all that work was surprisingly mostly user interface and saving the temporary files. I'll write a bigger post on all the problems I ran into and let this post be the announcement of the first released version of pyAstroStack.

No, I really haven't come up with a better name...

PyAstroStack 0.1


PyAstroStack is an open source stacking software for astronomical images taken with DSLR. This first version includes basic functionality such as subtracting and dividing images, debayering, registering and stacking. Supported image formats are limited to Canon EOS 1100D CR2 and similar. Don't expect anything spectacular. I'm not very experienced programmer.

Here's an example image what pyAstroStack can do. This is a median stack of about 30 exposures.

Image stacked with pyAstroStack. Full size in http://www.flickr.com/photos/96700120@N06/12621177443/

Features

  • Command line user interface
  • CFA to RGB conversion on OpenCL which makes it quite fast
    • Bilinear
    • LaRoche-Prescott
    • Variable Number of Gradients
  • Registering
    • SExtractor and method from http://adsabs.harvard.edu/abs/1986AJ.....91.1244G
  • Aligning
    • Affine transformations by ImageMagick
  • Stacking
    • Mean value
    • Median value

Supported cameras

  • Canon EOS 1100D
  • Everything else from Canon that has Bayer filter RGGB

Usage

  • Command line only. You really need to read the manual to use this. The software could really be user friendlier.
  • There might be a GUI in the future

Installation

Download and extract source package. See INSTALL.txt.

Help needed!

I have only access to one camera. Also my data isn't too good, I'm aware of that. That of course limits my test runs. What I would really appreciate is some raw photo sets that allows me to run tests on different features. 
  • Set of some light frames and proper flat frames. I'm bad at taking flats whenever I even bother to take them. This has made it quite difficult to implement flat frame calibrations properly.
  • Single example images from different cameras. This is just to make sure my program recognizes them and is able to debayer them properly. These images don't even have to be astronomical. Just something with recognizable colors.
If you would like to help, please contact via Google+

Wednesday, February 19, 2014

Moon for scale: Part 2

I did some comparison of apparent sizes of deep sky objects and the Moon (http://mikkolaine.blogspot.fi/2014/01/size-of-deep-sky-objects-compared-to.html) and that seems to be the most visited page on my blog so time for another one. These were actually made the same time with Andromeda and Orion Nebula, but for some reason I didn't include them in that post.

Flame Nebula and Horsehead Nebula

Names for these nebulae are quite describing. Flame nebula is easily visible and Horsehead a bit fainter. That red color is mostly filtered by digital cameras. With a modded camera that has the filter removed all the red details would be a lot brighter. Most people have seen photos of the Horshead nebula, but here's the size illustrated:

Bigger version: http://www.flickr.com/photos/96700120@N06/12630499714/

Jupiter

It's not a deep sky object, but interesting whatsoever. With naked eye Jupiter seems just like a star, but even a small telescope or binocular can show that it's not. Here's a composite picture comparing Jupiter and the Moon.

Bigger version: http://www.flickr.com/photos/96700120@N06/12630057315/

That's about it...

I don't think I have any more interesting photos to show. There hasn't been too many nights this winter to shoot any astrophotos... Too bad.

Sunday, January 19, 2014

Size of deep sky objects compared to the Moon

I wrote about this on some previous post, but I felt I'd have to get back to this. Most people, including me few years ago, don't realize how big all the galaxies and nebulae are in the sky. Most common example I've seen is the Andromeda galaxy.

Even if you could see it with naked eye (I've understood it's possible), it won't be more than a tiny smudge. But you won't need much of a camera to capture a lot more of it. Then you're starting to realize.

Here's a comparison of the Andromeda galaxy and the Moon. I took some photos of the Moon with a 200 mm lens, the same I use to photograph Andromeda. I then measured the size of the Moon and resampled a bigger photo (effective focal length 2400mm) to match that size. Resized Moon was then pasted next to Andromeda.

Wikipedia says the apparent size of Andromeda is 190' by 60'. 190 arc minutes is about 3.2 ° so a lot bigger than I measured from that photo. This is the amount I was able to catch on camera. (NOTE: I had mistakenly measured the size to 4.0 °. Now this is fixed.) Moon was on perigee when I took this so it should be about 30 arc minutes or 0.5 °

Here's another. Great Orion Nebula M42 with the Moon placed next to it. M42 is actually visible without any equipment almost everywhere. It's the Orion's Sword, three stars below Orion's Belt. From this photo you can see there's a bit more than three of them. The one on left is the top one on the sky.


Now just imagine if you could see all those galaxies and nebulae with your naked eye.

Tuesday, January 7, 2014

Orion, M42 and Horsehead Nebula

I still don't know much of the capabilities of my astrophotography set. As I've written before, I'm doing this on quite a tight budget. Partially my reason for this is that I see no point on buying expensive equipment that either I have no idea how to use (better cameras and lenses), or that does all the work on my behalf (goto-mounts). Of course you can get better photos that way, but where's the challenge? My plan is to learn things while doing this and getting better equipment when I definitely know what I need. Last thing I bought is a better lens: Canon EF 200mm f/2.8L II USM. After some testing this looks like a good buy.

Difference in my Andromeda photos were quite dramatic. 200/2.8L collects so much more light than my old EF 75-300mm f/4-5.6 III. Of course I started wondering how much better photos do I get from all the other objects I've already tried with my old lens. First thing that came to mind was Orion and M42. An awesome constellation for an amateur astrophotographer because there are so many different objects, some easy to see, some more and more difficult to even catch on camera.


Horsehead Nebula

One of the most fascinating objects to me is the Horsehead Nebula (Barnard 33) and I tried to photograph it as soon as I could. My first try was with the 75-300mm lens, and it was a disappointment.

Area of the Horsehead Nebula taken with EF 75-300mm f/4-5.6 III, at 2013-01-17
As you can see, no Horsehead even with a good imagination. Flame Nebula (which I was totally unaware of before this) can be seen somehow if you stretch the image to it's limits.

The next ones are taken later that year with a better lens.

Single shot of the Horsehead Nebula taken with EF 200mm f/2.8L II USM, at 2013-11-30
Here the Flame Nebula can be seen without extensive stretching and even the colors are about right. It's a single photo I took in November just before sky was filled with clouds. No further testing was possible. I didn't see the Horsehead back then but know that I know exactly where it should be, and if I use enough imagination, I think I can see it. Nothing spectacular though.

Single shot of the Horsehead Nebula taken with EF 200mm f/2.8L II USM, at 2013-12-30
This one's been taken December 30th 2013. After couple of months sky was clear for several hours. Clouds came around 11pm, but there was plenty of time to shoot Orion from balcony, even after clearing the problems. I lost the colors while stretching the photo, but Horsehead is can now be seen without imagination. I had about 20 of these and the stack made with IRIS looks like this:

Flame Nebula and Horsehead Nebula taken with EF 200mm f/2.8L II USM, at 2013-12-30. 20x30s exposure stacked with IRIS, postprocessing with Darktable.
Horsehead is easily visible. Mission accomplished.

The Flame Nebula took me by a surprise. For some reason I wasn't aware of that before I saw it in the photo. While stretching the colors on this photo I decided I'll learn how to shoot proper flat fields. The background is so difficult to fix in postprocessing. It even shows in this cropped image.
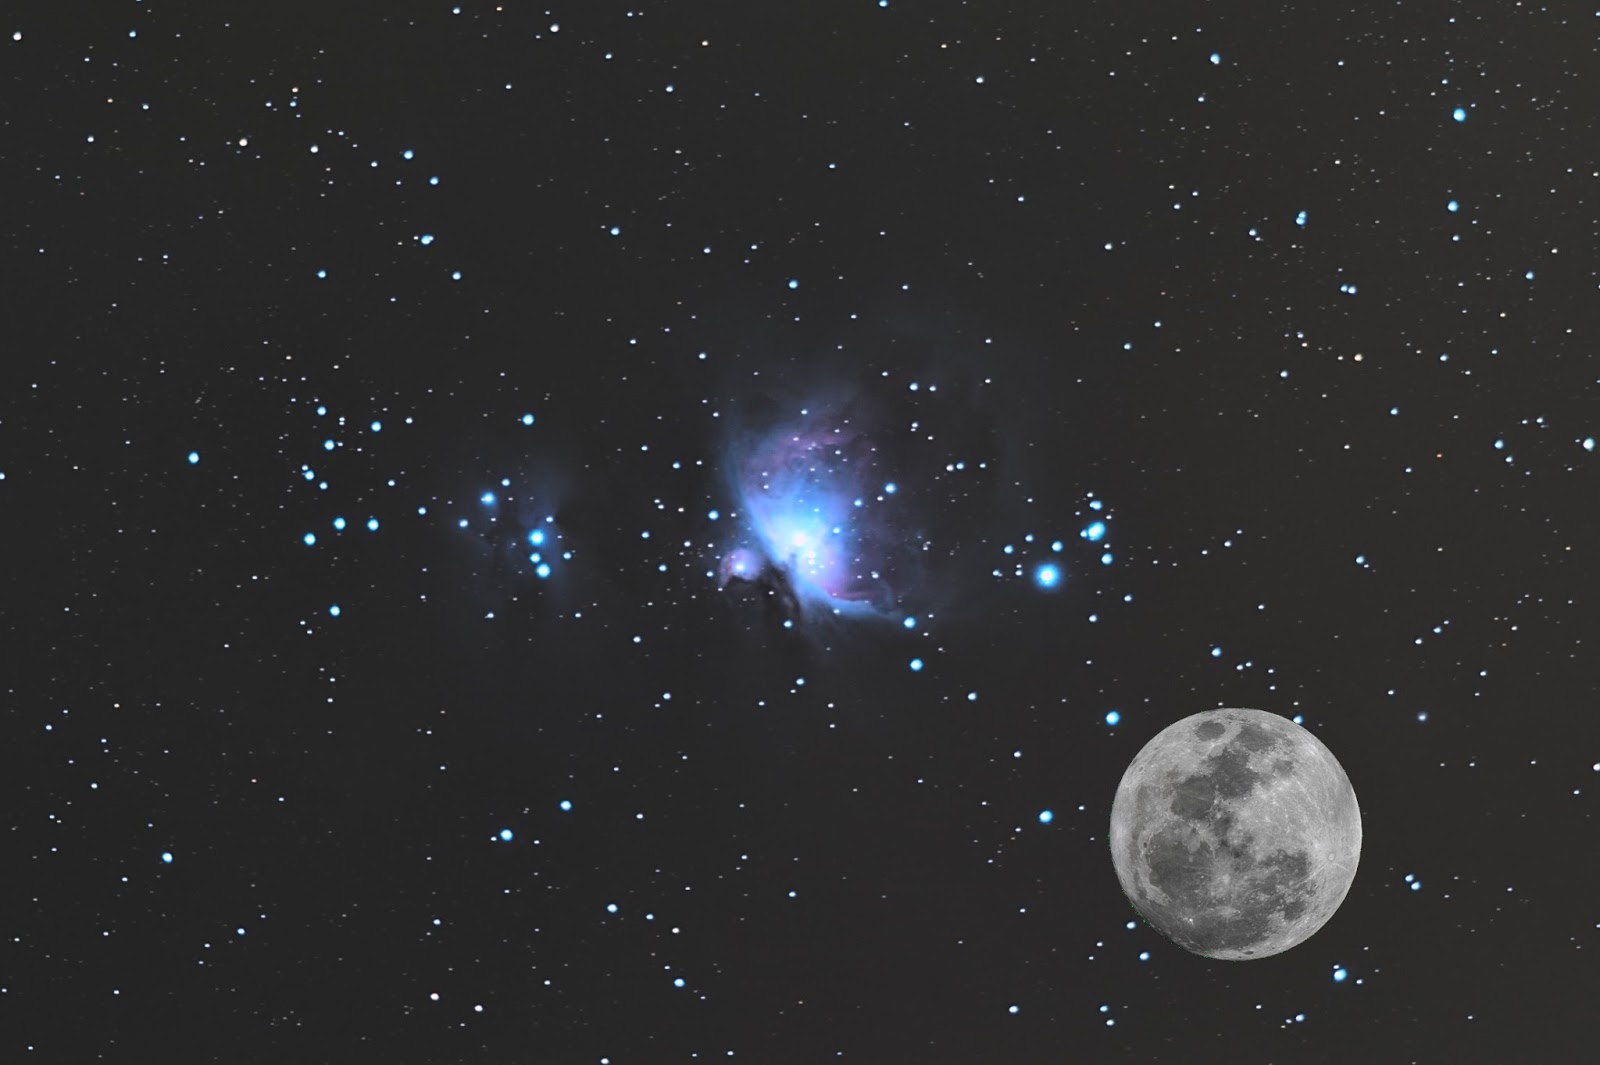
Orion

I've concentrated too much on too small objects. Images of larger scale can be nice too and one can more easily use longer exposures. Too bad I don't have a good camera lens for that. Only the one that came with the camera. I set it to 55 mm and tried to fit as much Orion as possible on screen. 

First I took a long exposure. I don't have a cable release and my camera supports exposures only up to 30s. There's Bulb-setting so I pressed the trigger for a while. From image exif I read it was 95 seconds. I processed the image on Darktable and here's the result:

Single 95 second shot of Orion

I also took series of photos, 10x30 seconds, and stacked them with IRIS. Total exposure is more than 3 times of the one above, but I think I still like the single shot more. I'll better prepare my camera control set before the next clear sky.

Stacked 10x30 second exposures of Orion

Great Orion Nebula M42

I also took more shots of the Orion Nebula M42. I've photographed this a lot in the past, but of course my skills get better and sometimes my equipment too. This time I tried stacking with Regim instead of IRIS.

Stacked 30x30 second exposures of M42
Level of visible details looks better than any of my photos before. Colors on the other hand are a bit wrong. I think what's green there should be blue. I'll have to try IRIS for the stacking as well.

Update:

Looks like Regim used the wrong Bayer matrix for my raw photos. When I manually set the correct one, the colors look the way they should look.


...more or less. I'd still like some blue there. Even the single shots show some blue, so it's kind of strange the stack doesn't.

And one more:

The same again, but now with IRIS. Finally I got the blue color I missed.


Mikko's Nonexistent Comet and Identical Ghost Nebulae

Lately several of my astrophotos have had some sort of lens flares or other reflections. I've figured that they're from street lights or yard lights. After all I do most of my observations and photographs on my backyard. Usually these flares appear on the edge of photo so I won't have to worry about them. Couple of times they have surprised me though.

Mikko's Nonexistent Comet


I was taking a panorama of Cassiopeia. That panorama didn't work (not enough overlapping), but there was this "comet" on one of the images. I immediately checked the other images as well and realized what this was. There's a star in a very convenient place to make the flare look like comet's tail. The next image had the same flare but the star had moved away from it.

Identical Ghost Nebulae

I was testing whether I could photograph the Horsehead Nebula. I had the EQ-mount surprisingly well set. I could take 30 second exposures with 200mm, where I usually have to settle to 20 sec or less. Flare nebula was easily visible on camera screen so I started to take series of photos. Then I noticed this:


First of all, there shouldn't be anything like that on sky, at least on Orion. But now there's two identical! I was taking the photos on my balcony and there were some lights from neighbors that might find their way to my camera even though I had quite a long hood on the lens. I put some cardboard to block all light I could think of, but still the flares remained.

I zoomed and looked the image thoroughly and I saw a third one. Then I got it. Those flares weren't from lights around me but from the stars. The next image (click it larger if the small one doesn't show) explains it quite well. There are three flares and three bright stars. Moreover, the positions of the flares are exact π rotation of star positions.


The flares were caused by UV-filter I had on the lens. I read somewhere that the filter does not affect anyhow on stellar photography so I've kept it on the lens to cover it. Looks like I have to remove it from now on. Without it there were no flares.