Sunday, January 19, 2014

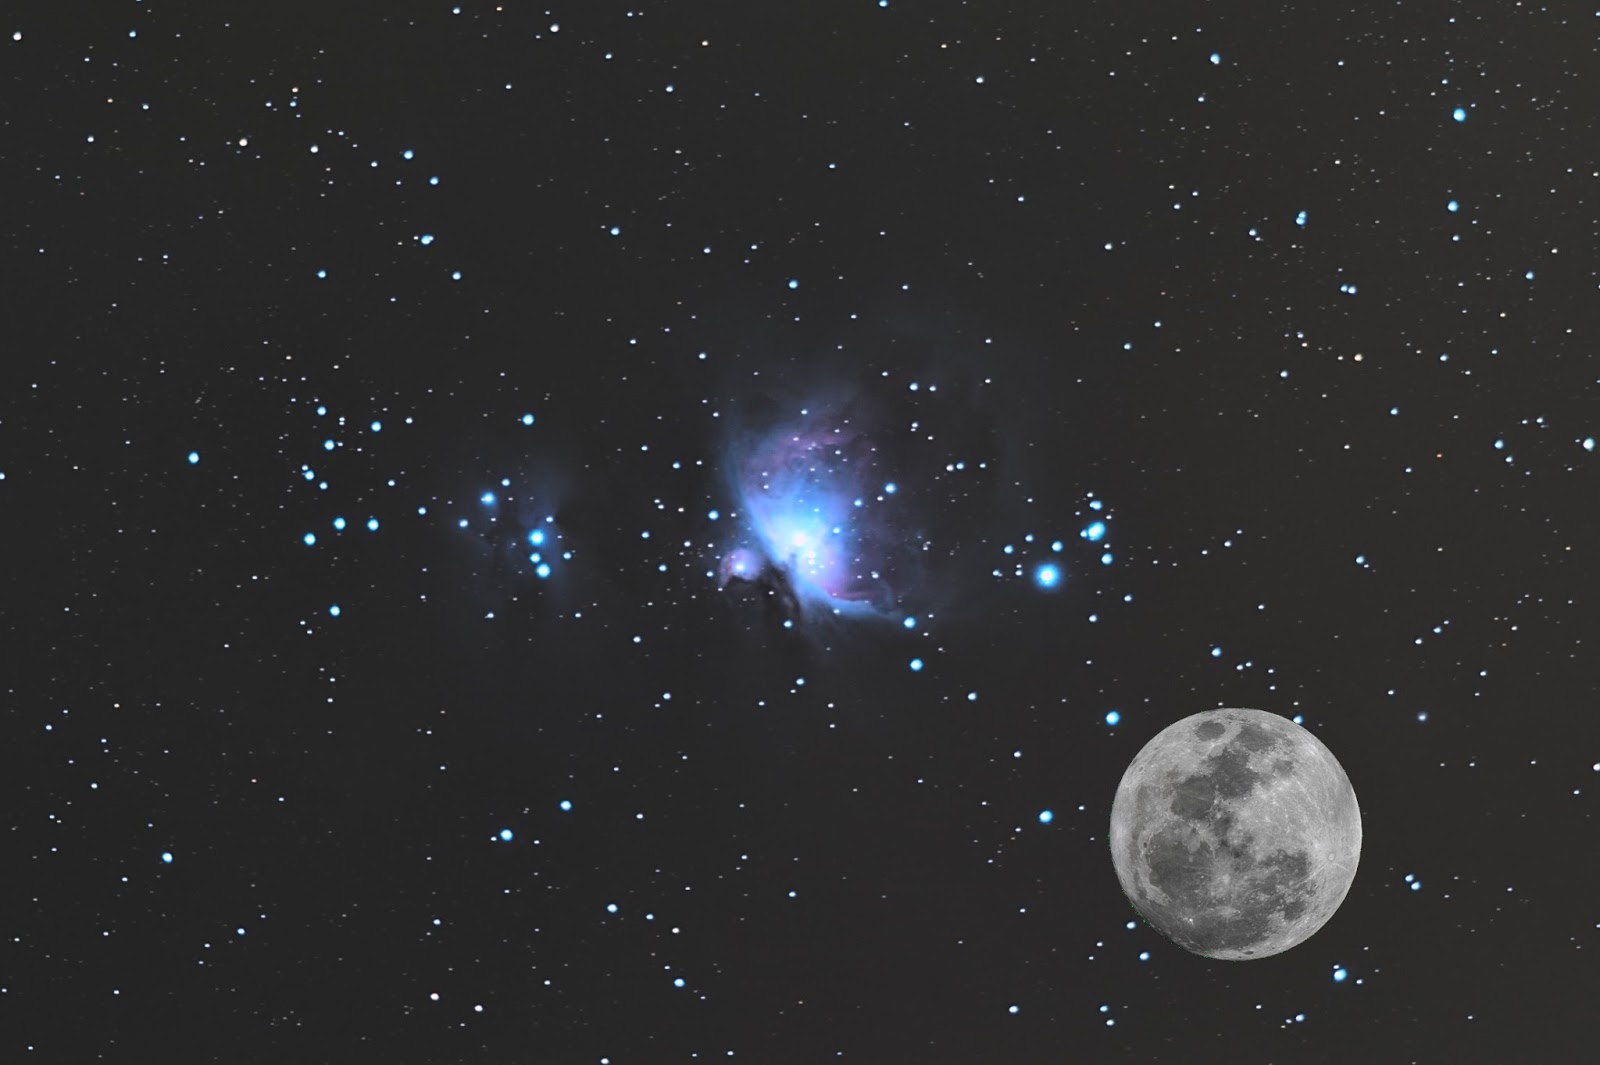
Size of deep sky objects compared to the Moon

I wrote about this on some previous post, but I felt I'd have to get back to this. Most people, including me few years ago, don't realize how big all the galaxies and nebulae are in the sky. Most common example I've seen is the Andromeda galaxy.

Even if you could see it with naked eye (I've understood it's possible), it won't be more than a tiny smudge. But you won't need much of a camera to capture a lot more of it. Then you're starting to realize.

Here's a comparison of the Andromeda galaxy and the Moon. I took some photos of the Moon with a 200 mm lens, the same I use to photograph Andromeda. I then measured the size of the Moon and resampled a bigger photo (effective focal length 2400mm) to match that size. Resized Moon was then pasted next to Andromeda.

Wikipedia says the apparent size of Andromeda is 190' by 60'. 190 arc minutes is about 3.2 ° so a lot bigger than I measured from that photo. This is the amount I was able to catch on camera. (NOTE: I had mistakenly measured the size to 4.0 °. Now this is fixed.) Moon was on perigee when I took this so it should be about 30 arc minutes or 0.5 °

Here's another. Great Orion Nebula M42 with the Moon placed next to it. M42 is actually visible without any equipment almost everywhere. It's the Orion's Sword, three stars below Orion's Belt. From this photo you can see there's a bit more than three of them. The one on left is the top one on the sky.


Now just imagine if you could see all those galaxies and nebulae with your naked eye.

Tuesday, January 7, 2014

Orion, M42 and Horsehead Nebula

I still don't know much of the capabilities of my astrophotography set. As I've written before, I'm doing this on quite a tight budget. Partially my reason for this is that I see no point on buying expensive equipment that either I have no idea how to use (better cameras and lenses), or that does all the work on my behalf (goto-mounts). Of course you can get better photos that way, but where's the challenge? My plan is to learn things while doing this and getting better equipment when I definitely know what I need. Last thing I bought is a better lens: Canon EF 200mm f/2.8L II USM. After some testing this looks like a good buy.

Difference in my Andromeda photos were quite dramatic. 200/2.8L collects so much more light than my old EF 75-300mm f/4-5.6 III. Of course I started wondering how much better photos do I get from all the other objects I've already tried with my old lens. First thing that came to mind was Orion and M42. An awesome constellation for an amateur astrophotographer because there are so many different objects, some easy to see, some more and more difficult to even catch on camera.


Horsehead Nebula

One of the most fascinating objects to me is the Horsehead Nebula (Barnard 33) and I tried to photograph it as soon as I could. My first try was with the 75-300mm lens, and it was a disappointment.

Area of the Horsehead Nebula taken with EF 75-300mm f/4-5.6 III, at 2013-01-17
As you can see, no Horsehead even with a good imagination. Flame Nebula (which I was totally unaware of before this) can be seen somehow if you stretch the image to it's limits.

The next ones are taken later that year with a better lens.

Single shot of the Horsehead Nebula taken with EF 200mm f/2.8L II USM, at 2013-11-30
Here the Flame Nebula can be seen without extensive stretching and even the colors are about right. It's a single photo I took in November just before sky was filled with clouds. No further testing was possible. I didn't see the Horsehead back then but know that I know exactly where it should be, and if I use enough imagination, I think I can see it. Nothing spectacular though.

Single shot of the Horsehead Nebula taken with EF 200mm f/2.8L II USM, at 2013-12-30
This one's been taken December 30th 2013. After couple of months sky was clear for several hours. Clouds came around 11pm, but there was plenty of time to shoot Orion from balcony, even after clearing the problems. I lost the colors while stretching the photo, but Horsehead is can now be seen without imagination. I had about 20 of these and the stack made with IRIS looks like this:

Flame Nebula and Horsehead Nebula taken with EF 200mm f/2.8L II USM, at 2013-12-30. 20x30s exposure stacked with IRIS, postprocessing with Darktable.
Horsehead is easily visible. Mission accomplished.

The Flame Nebula took me by a surprise. For some reason I wasn't aware of that before I saw it in the photo. While stretching the colors on this photo I decided I'll learn how to shoot proper flat fields. The background is so difficult to fix in postprocessing. It even shows in this cropped image.

Orion

I've concentrated too much on too small objects. Images of larger scale can be nice too and one can more easily use longer exposures. Too bad I don't have a good camera lens for that. Only the one that came with the camera. I set it to 55 mm and tried to fit as much Orion as possible on screen. 

First I took a long exposure. I don't have a cable release and my camera supports exposures only up to 30s. There's Bulb-setting so I pressed the trigger for a while. From image exif I read it was 95 seconds. I processed the image on Darktable and here's the result:

Single 95 second shot of Orion

I also took series of photos, 10x30 seconds, and stacked them with IRIS. Total exposure is more than 3 times of the one above, but I think I still like the single shot more. I'll better prepare my camera control set before the next clear sky.

Stacked 10x30 second exposures of Orion

Great Orion Nebula M42

I also took more shots of the Orion Nebula M42. I've photographed this a lot in the past, but of course my skills get better and sometimes my equipment too. This time I tried stacking with Regim instead of IRIS.

Stacked 30x30 second exposures of M42
Level of visible details looks better than any of my photos before. Colors on the other hand are a bit wrong. I think what's green there should be blue. I'll have to try IRIS for the stacking as well.

Update:

Looks like Regim used the wrong Bayer matrix for my raw photos. When I manually set the correct one, the colors look the way they should look.


...more or less. I'd still like some blue there. Even the single shots show some blue, so it's kind of strange the stack doesn't.

And one more:

The same again, but now with IRIS. Finally I got the blue color I missed.


Mikko's Nonexistent Comet and Identical Ghost Nebulae

Lately several of my astrophotos have had some sort of lens flares or other reflections. I've figured that they're from street lights or yard lights. After all I do most of my observations and photographs on my backyard. Usually these flares appear on the edge of photo so I won't have to worry about them. Couple of times they have surprised me though.

Mikko's Nonexistent Comet


I was taking a panorama of Cassiopeia. That panorama didn't work (not enough overlapping), but there was this "comet" on one of the images. I immediately checked the other images as well and realized what this was. There's a star in a very convenient place to make the flare look like comet's tail. The next image had the same flare but the star had moved away from it.

Identical Ghost Nebulae

I was testing whether I could photograph the Horsehead Nebula. I had the EQ-mount surprisingly well set. I could take 30 second exposures with 200mm, where I usually have to settle to 20 sec or less. Flare nebula was easily visible on camera screen so I started to take series of photos. Then I noticed this:


First of all, there shouldn't be anything like that on sky, at least on Orion. But now there's two identical! I was taking the photos on my balcony and there were some lights from neighbors that might find their way to my camera even though I had quite a long hood on the lens. I put some cardboard to block all light I could think of, but still the flares remained.

I zoomed and looked the image thoroughly and I saw a third one. Then I got it. Those flares weren't from lights around me but from the stars. The next image (click it larger if the small one doesn't show) explains it quite well. There are three flares and three bright stars. Moreover, the positions of the flares are exact π rotation of star positions.


The flares were caused by UV-filter I had on the lens. I read somewhere that the filter does not affect anyhow on stellar photography so I've kept it on the lens to cover it. Looks like I have to remove it from now on. Without it there were no flares.

Tuesday, November 5, 2013

pyAstroStack: Getting prepared for first release

...where getting prepared means a LOT of work. By number of code lines maybe even more than there already is.

Things I'm working on, one by one:

Project file

I want the stacking process to be possible to continue on a later time starting from any point. I also want to make possible for example do the stacking couple times on different settings (perhaps to test which method works the best).

I'm implementing this via project file. It holds all the necessary information about source photos and what's done with them. Program reads the project file and it can tell user what's already done and what might be the next step. It also knows location to uncalibrated cfa-images, calibrated images, demosaiced images, registered images etc... so user can do any step again if wanted.

The project file approach is also required by my user interface.

User Interface

Eventually I'd like to have a graphical user interface (most likely PyQt) but for now only command line. I'm starting to like IRIS and its command window so that's what I had originally in mind. I got deviated a bit...

Here's how it's going to work:

AstroStack <operation> <project> <arguments>

Some examples (ones I have already implemented)

AstroStack init Andromeda
- Initialize a new project by the name of Andromeda

AstroStack adddir Andromeda light /media/.../Andromeda/
- Add all files of proper type from specified directory to project as light pictures. Actually this isn't fully implemented. It works now without the "light" argument but it asks what the type is.

AstroStack addfile Andromeda light /media/.../Andromeda/IMG_6234.CR2
- Add one file to project. Otherwise same as before. This probably should be made to understand wildcards.

AstroStack stack Andromeda flat
- Stack the flat images in the project file. This creates a file called masterflat.fits in working directory and will save the information about masterflat in the project file. I'll change all the file names to be project specific so there can be several simultaneous projects that don't interfere each other.

AstroStack demosaic Andromeda
AstroStack register Andromeda
- These are in the code but haven't been tested. Probably won't work yet.

I hope this shows the idea how the program is going to work. I'm also thinking of GUI implementation all the time and I'm trying to write everything compatible for it so no rewrite should be necessary then.

Check and rewrite everything for UI compability

I didn't really think how the UI is going to work when I first wrote this. Everything is classes and objects so it should be trivial to get everything working on UI instead of test script. Mostly the changes have been about where method gets it's arguments. Incorporating project files also requires changes so there won't be several places to update information.

Decide on image format

First I used FITS via astropy.fits, but I ran into some problems with it. I changed image format to TIFF via Pillow.Image but I've ran into even more problems... FITS might still be the better choice. AstroPy also has one advantage to Pillow: It's designed for exactly this use. I understood it supports automatically slicing large arrays into small ones which is handy for calculating medians.

Problems with TIFF
  • Pillow indexes arrays differently than SExtractor does with FITS. This requires coordination system changes in registering
  • Saving intermediate files with better precision than the final. Pillow doesn't like my numpy.float32's and such.
  • Saving RGB images. For some reason all RGB's I tried to save were only mess.
Problems with FITS
  • Creating them. I learned the right switches for Rawtran, but the problem is the program itself. I dislike the idea of having a dependency people have to compile themselves. I'll try to change this to DCRaw only or DCRaw + ImageMagick combo
  • Final result should be other than FITS for easier postprocessing. TIFF suits fine, but that means Pillow would remain as a dependency
ImageMagick is being used for affine transformations and I'm not sure if it can do that to FITS files. Better try soon before deciding. Otherwise I'm choosing FITS.

Change IDE

Does concern the program a bit. Eclipse was massive and sluggish and I constantly had problems with either PyDev or eGit (or whatever the Git plugin was called). I ranted about this on IRC and got suggested PyCharm. The free version seems extremely nice, fast and git works out-of-the-box. First things I did after changing to PyCharm was to fix all the PEP8 problems the program suggested. Agreed, the code is much readable now.

I'm also trying 2-panel setup. I've been switching between to files so much that this could be useful.

Better demosaic and median stacking

I want these to be ready before releasing version 0.1. Demosaic is now bilinear and the way it lost all the colours on my test images suggests it doesn't work too well. I found something called LaRoche-Prescott demosaicing algorithm and I decided to give it a go.

Stacking works now only by mean value, which is fast and easy to implement. Eventually I want to have sigma medians and such but for the first release I want at least median stacking.

Memory usage

While running tests, I ran out of RAM. And I have 16 GB of it. So that's a problem. Seems like Pythons garbage collecting isn't that efficient without programmers help. I managed to make stacking work on about 5 GB (with 30 light images) but I still think that's too much. Have to make that lower.

That's about it...

A lot to do as I said. Where I'm now?


This can already be done, so core modules seems to work. It's everything around it that needs work.

BTW, I've been using Andromeda galaxy as my test images and hence all the images so far processed have been about Andromeda. I decided to give names of celestial objects to different versions of pyAstroStack. Version 0.1 will be Andromeda. That's already a name of a branch in BitBucket.


Tuesday, October 22, 2013

pyAstroStack: Calibration works, affine transformations by ImageMagick

Actually all that worked already before the previous post. I had to do couple of changes to the calibration functions because now images are monochrome and before RGB, but otherwise everything was in order.

I had some problems on master dark being white, but I found out that to be because the program was reusing old temporary dark#.tiff files. Master bias was subtracted once every time I ran the program causing values of uint16 go below zero. I now changed the program to use float32 during the process and output int16 only when everything is ready. Also temporary files are now manually removed before every new test run.

I noticed ImageMagick can do affine transformations based on matching pairs. Just what I need! It's a lot faster than Scikit-Image, which I won't be needing anymore so one less dependency to worry about. I could probably do a lot more with ImageMagick as well so I have to look into that some more. This project isn't about coding everything by myself. It's about getting astronomical image stacking done on open source software. Hence, ImageMagick is fine.

Next I think I should make some kind of a project file which holds information about temporary files and which can be removed and which reused.

So here's the first result of full calibration process.


That's of course not what my code outputs. Postprocessing has been done with Darktable. Bigger version again on Flickr: http://www.flickr.com/photos/96700120@N06/10427590704/

I addition to project file I'll start working on interpolating calibrated raw images into RGB.

Btw, the whole process takes now 7 min 30 s. That's for 30 bias, 10 dark, 7 flat and 30 light frames. That's quite good, I think.

Monday, October 21, 2013

Unexpected problems with image alignment

Continuing the development of pyAstroStack (I have to come up with a better name for it...) and I ran into problems where I didn't quite expect them.

I'm also starting to find out that when I thought I knew what happens in the image registration and stacking, I'm actually missing quite a lot. I knew about the Bayer filter in DSLR, but seems like I misunderstood how it's used. I thought there are 12M red pixels, 12M blue pixels and 24M green pixels in 12Mpix sensor, when there actually are 3M red, 3M blue and 6M green. I also didn't understand that converting a raw photo into fits or tiff with DCRaw's (or Rawtran's) default settings, doesn't give me the real raw data. So the first version of my program used interpolated color data from the beginning. I started to fix this.

I had difficulties understanding Rawtrans switches but I knew what I had to do with DCRaw in order to get debayered data from raws. Rawtran gave me FITS, but DCRaw PPM or TIFF. I wanted my program to output TIFF so I decided to change AstroPy.Fits to something that uses TIFF. I found Pillow. It can also import images into numpy.arrays, so I should be able to do the transition easily...

I made a lot of changes before sunning proper tests. I tried to include dark, bias and flat calibrations at the same time and when I finally ran tests, all the resulting images were mostly black. I removed functions about calibration from my test program but to no effect. I stretched images to extreme and found this:


Seems to me like registration fails. I really couldn't understand this since I hadn't touched anything related to registration. All the changes were in image loading and stacking. The weirdest thing to me was, why alignment fails only for Y-coordinates and X is ok. It took me a while to figure this out. I reverted to older, working, version of the code and started making all the changes to it one by one and running tests after each change. Pillow and TIFF was the cause. Still I couldn't understand why until I ran everything using FITS but the output as TIFF. Result was perfectly aligned image, upside down! Either TIFF handles coordinates in different order than FITS or just Pillow-library makes the numpy.array with flipped Y, but now that I knew the cause, it was simple to fix.

Star coordinates were fetched on SExtractor using FITS even when everything else used TIFF so the Y-coordinate was always reversed. I simply changed the Y SExtractor gave into Ymax - Y and everything worked.


My plan was to have calibration done by now, but this mix up of coordinates took more time than it should. Reminds me how amateur I still am...

What next?

Maybe now I can work on the calibration. For what I've understood the procedure is
  • masterbias = stack(bias)
  • masterdark = stack(dark - masterbias)
  • masterflat = stack(flat - masterdark - masterbias)
  • stack((light - masterdark - masterbias)/masterflat)
Feels like masterflat should be normalized. It doesn't make any sense to me dividing by same and bigger values you find in light images. Dividing by flat normalized to [0,1] feels like a better idea.

Also colouring the images would be nice. As I said, the first images were made from interpolated raws and now I'm using properly debayered (I think). After calibrations I should interpolate monochromes into colour images with a correct bayer mask. If I'm right about how it's done, it doesn't sound too fast of an operation on Python. Perhaps PyCuda here? Some introduction to PyCuda I read said it's at its best on calculating numpy.arrays.

Sunday, October 13, 2013

New project: pyAstroStack

It has been bothering me that there are no free stacking software for astrophotographers for Linux. I've heard PixInsight is awesome and I have no doubt, but it costs money. I wonder why no one has ever made a free (as in freedom) alternative. Maybe because there are decent free (as in free beer) programs such as DSS, Regim or IRIS (which I compared here).

I decided to try and code one myself. I basically understand a lot of the mathematics involved. I've studied programming a bit alongside physics and mathematics so I thought I might have the skills... Still there has been some problems where I least expected them. For example making an affine transform for a data matrix was surprisingly difficult.

So now I announce:

pyAstroStack

An open source stacking software for astronomical images

For now the program is extremely limited. It works from command line and is configured by editing the source code. It also does stacking only by average value, doesn't calibrate images with dark, flat and bias, saves result only in three fits (one for each colour channel)... But it works for my test data! That's when I thought I'd make this public.

My test data was the best astrophoto I've taken. Not much as you can see, but nevertheless it is my best. Here's the first successful result of my own code.

Andromeda, stacked with pyAstroStack and postprocessed with ImageMagick and Darktable
Stacking was done in pyAstroStack and open source software was used also for the postprocessing. First I tried Iris for setting colour balance on the FITS and saving it as TIFF and it did a lot better job than I could in Darktable. My goal was to have everything done on open source software so that's why no Iris is used on this image.

And here's the same stacked with Iris http://www.flickr.com/photos/96700120@N06/10002768985/in/set-72157634344389164

The code can be seen in Bitbucket. It's licensed under GPLv3. I hope this'll go somewhere and that I have time and resources to make it easier to use and install. If you read this far, I assume you are somewhat interested in the project. Awesome. If you have any ideas on how to make the registering faster or reduce the number of required Python libraries, I'm all ears.

Feel free to add enhancement or proposal ideas on issue tracker in Bitbucket.