Tuesday, April 8, 2014

pyAstroStack 0.3.0 - Lots of speedups and OpenCL no longer required

I released 0.2.1 just about a week ago and now I'm about to push 0.2.5 out. First the updates were indeed minor, but they grew and became quite important considering the whole program. After finishing 0.2.5 and hunting down its bugs I decided this version should be 0.3.0 instead.

Installation still requires Python-pip on Ubuntu 13.10, but I'm already targeting this on soon to be released 14.04. There might even be a deb-package or repository on Launchpad if I figure them out.

Here's a summary of changes:

  • Bilinear and Variable Number of Gradients (VNG ) debayering algorithms. This makes PyOpenCL not required. With OpenCL the methods are a bit faster but the difference is about 10-20%.
  • PyAstroStack will work on Ubuntu 14.04 without too much hassle. There are a lot of packages to install but everything seems to be on package manager.
  • Fixed a huge memory leak on registering operations.
  • Registering speedups on 
    • correctly Cythonizing _step2.pyx
    • changing ImageMagick to Scikit-image
    • not requiring SExtractor and star matching if registering (aligning) same batch again
Full list of changes in distribution package on in Git repository.


Prints from AstroStack

Saturday, March 29, 2014

pyAstroStack 0.2.1 - Now it might even work!

Should I say it once more? I really don't have experience on working with any programming projects this big. I seem to learn everything the hard way. Before releasing the first alpha, the biggest problems were with writing the user interface. Something I've never done properly. Everything has been my own little programs so I always could edit the source. No need for UI then...

But even that was something I just needed to work on. After 0.1.0 it came to my knowledge that the program is too difficult to install. Not pyAstroStack itself but its requirements. Some libraries I used were on Gentoo's Portage, which I use for coding and testing, but they're missing even on Ubuntu or Debian. That could be circumvented with Pip. A bigger problem was OpenCl. My debayering algorithms rely on pyOpenCl and the program is quite useless without it. On Gentoo it worked if I had just the right version of Nvidia drivers, but on Ubuntu it didn't. It was possible to hack it working, but I'd rather have it easier.

On Ubuntu 14.04 things seem to work better. I haven't tested everything yet but at least OpenCl works after installing Nvidia's proprietary drivers.

Version 0.2 doesn't have any new features. There are rewritten classes, some speed improvement, things work a lot differently under the hood... Most changes were preparing to write a graphical user interface. I've chosen PySide with QML for implementing it. Now I just have to learn how to write QML. :)

Here's a link once more to download pyAstroStack: PyAstroStack on BitBucket


Saturday, February 22, 2014

pyAstroStack: First alpha release!

First I have to say that this project was a lot bigger than I thought. Even on the limited functionality it has now there was a lot more work I was prepared to. And all that work was surprisingly mostly user interface and saving the temporary files. I'll write a bigger post on all the problems I ran into and let this post be the announcement of the first released version of pyAstroStack.

No, I really haven't come up with a better name...

PyAstroStack 0.1


PyAstroStack is an open source stacking software for astronomical images taken with DSLR. This first version includes basic functionality such as subtracting and dividing images, debayering, registering and stacking. Supported image formats are limited to Canon EOS 1100D CR2 and similar. Don't expect anything spectacular. I'm not very experienced programmer.

Here's an example image what pyAstroStack can do. This is a median stack of about 30 exposures.

Image stacked with pyAstroStack. Full size in http://www.flickr.com/photos/96700120@N06/12621177443/

Features

  • Command line user interface
  • CFA to RGB conversion on OpenCL which makes it quite fast
    • Bilinear
    • LaRoche-Prescott
    • Variable Number of Gradients
  • Registering
    • SExtractor and method from http://adsabs.harvard.edu/abs/1986AJ.....91.1244G
  • Aligning
    • Affine transformations by ImageMagick
  • Stacking
    • Mean value
    • Median value

Supported cameras

  • Canon EOS 1100D
  • Everything else from Canon that has Bayer filter RGGB

Usage

  • Command line only. You really need to read the manual to use this. The software could really be user friendlier.
  • There might be a GUI in the future

Installation

Download and extract source package. See INSTALL.txt.

Help needed!

I have only access to one camera. Also my data isn't too good, I'm aware of that. That of course limits my test runs. What I would really appreciate is some raw photo sets that allows me to run tests on different features. 
  • Set of some light frames and proper flat frames. I'm bad at taking flats whenever I even bother to take them. This has made it quite difficult to implement flat frame calibrations properly.
  • Single example images from different cameras. This is just to make sure my program recognizes them and is able to debayer them properly. These images don't even have to be astronomical. Just something with recognizable colors.
If you would like to help, please contact via Google+

Wednesday, February 19, 2014

Moon for scale: Part 2

I did some comparison of apparent sizes of deep sky objects and the Moon (http://mikkolaine.blogspot.fi/2014/01/size-of-deep-sky-objects-compared-to.html) and that seems to be the most visited page on my blog so time for another one. These were actually made the same time with Andromeda and Orion Nebula, but for some reason I didn't include them in that post.

Flame Nebula and Horsehead Nebula

Names for these nebulae are quite describing. Flame nebula is easily visible and Horsehead a bit fainter. That red color is mostly filtered by digital cameras. With a modded camera that has the filter removed all the red details would be a lot brighter. Most people have seen photos of the Horshead nebula, but here's the size illustrated:

Bigger version: http://www.flickr.com/photos/96700120@N06/12630499714/

Jupiter

It's not a deep sky object, but interesting whatsoever. With naked eye Jupiter seems just like a star, but even a small telescope or binocular can show that it's not. Here's a composite picture comparing Jupiter and the Moon.

Bigger version: http://www.flickr.com/photos/96700120@N06/12630057315/

That's about it...

I don't think I have any more interesting photos to show. There hasn't been too many nights this winter to shoot any astrophotos... Too bad.

Sunday, January 19, 2014

Size of deep sky objects compared to the Moon

I wrote about this on some previous post, but I felt I'd have to get back to this. Most people, including me few years ago, don't realize how big all the galaxies and nebulae are in the sky. Most common example I've seen is the Andromeda galaxy.

Even if you could see it with naked eye (I've understood it's possible), it won't be more than a tiny smudge. But you won't need much of a camera to capture a lot more of it. Then you're starting to realize.

Here's a comparison of the Andromeda galaxy and the Moon. I took some photos of the Moon with a 200 mm lens, the same I use to photograph Andromeda. I then measured the size of the Moon and resampled a bigger photo (effective focal length 2400mm) to match that size. Resized Moon was then pasted next to Andromeda.

Wikipedia says the apparent size of Andromeda is 190' by 60'. 190 arc minutes is about 3.2 ° so a lot bigger than I measured from that photo. This is the amount I was able to catch on camera. (NOTE: I had mistakenly measured the size to 4.0 °. Now this is fixed.) Moon was on perigee when I took this so it should be about 30 arc minutes or 0.5 °

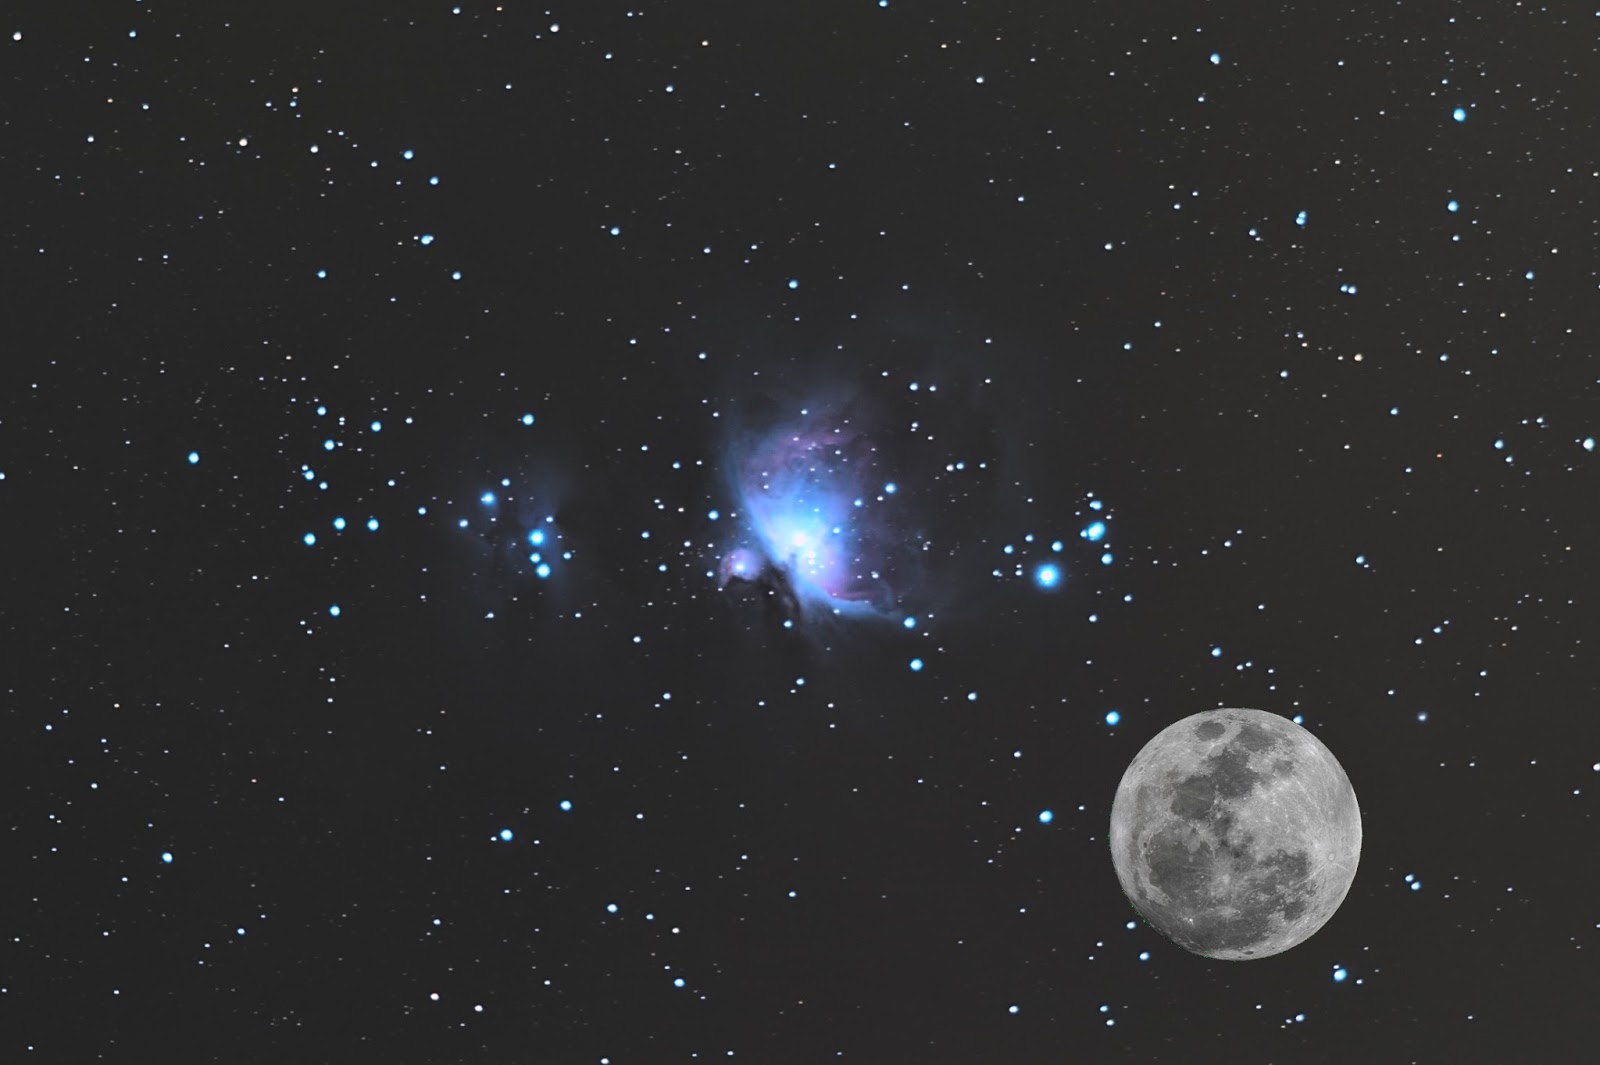
Here's another. Great Orion Nebula M42 with the Moon placed next to it. M42 is actually visible without any equipment almost everywhere. It's the Orion's Sword, three stars below Orion's Belt. From this photo you can see there's a bit more than three of them. The one on left is the top one on the sky.


Now just imagine if you could see all those galaxies and nebulae with your naked eye.

Tuesday, January 7, 2014

Orion, M42 and Horsehead Nebula

I still don't know much of the capabilities of my astrophotography set. As I've written before, I'm doing this on quite a tight budget. Partially my reason for this is that I see no point on buying expensive equipment that either I have no idea how to use (better cameras and lenses), or that does all the work on my behalf (goto-mounts). Of course you can get better photos that way, but where's the challenge? My plan is to learn things while doing this and getting better equipment when I definitely know what I need. Last thing I bought is a better lens: Canon EF 200mm f/2.8L II USM. After some testing this looks like a good buy.

Difference in my Andromeda photos were quite dramatic. 200/2.8L collects so much more light than my old EF 75-300mm f/4-5.6 III. Of course I started wondering how much better photos do I get from all the other objects I've already tried with my old lens. First thing that came to mind was Orion and M42. An awesome constellation for an amateur astrophotographer because there are so many different objects, some easy to see, some more and more difficult to even catch on camera.


Horsehead Nebula

One of the most fascinating objects to me is the Horsehead Nebula (Barnard 33) and I tried to photograph it as soon as I could. My first try was with the 75-300mm lens, and it was a disappointment.

Area of the Horsehead Nebula taken with EF 75-300mm f/4-5.6 III, at 2013-01-17
As you can see, no Horsehead even with a good imagination. Flame Nebula (which I was totally unaware of before this) can be seen somehow if you stretch the image to it's limits.

The next ones are taken later that year with a better lens.

Single shot of the Horsehead Nebula taken with EF 200mm f/2.8L II USM, at 2013-11-30
Here the Flame Nebula can be seen without extensive stretching and even the colors are about right. It's a single photo I took in November just before sky was filled with clouds. No further testing was possible. I didn't see the Horsehead back then but know that I know exactly where it should be, and if I use enough imagination, I think I can see it. Nothing spectacular though.

Single shot of the Horsehead Nebula taken with EF 200mm f/2.8L II USM, at 2013-12-30
This one's been taken December 30th 2013. After couple of months sky was clear for several hours. Clouds came around 11pm, but there was plenty of time to shoot Orion from balcony, even after clearing the problems. I lost the colors while stretching the photo, but Horsehead is can now be seen without imagination. I had about 20 of these and the stack made with IRIS looks like this:

Flame Nebula and Horsehead Nebula taken with EF 200mm f/2.8L II USM, at 2013-12-30. 20x30s exposure stacked with IRIS, postprocessing with Darktable.
Horsehead is easily visible. Mission accomplished.

The Flame Nebula took me by a surprise. For some reason I wasn't aware of that before I saw it in the photo. While stretching the colors on this photo I decided I'll learn how to shoot proper flat fields. The background is so difficult to fix in postprocessing. It even shows in this cropped image.

Orion

I've concentrated too much on too small objects. Images of larger scale can be nice too and one can more easily use longer exposures. Too bad I don't have a good camera lens for that. Only the one that came with the camera. I set it to 55 mm and tried to fit as much Orion as possible on screen. 

First I took a long exposure. I don't have a cable release and my camera supports exposures only up to 30s. There's Bulb-setting so I pressed the trigger for a while. From image exif I read it was 95 seconds. I processed the image on Darktable and here's the result:

Single 95 second shot of Orion

I also took series of photos, 10x30 seconds, and stacked them with IRIS. Total exposure is more than 3 times of the one above, but I think I still like the single shot more. I'll better prepare my camera control set before the next clear sky.

Stacked 10x30 second exposures of Orion

Great Orion Nebula M42

I also took more shots of the Orion Nebula M42. I've photographed this a lot in the past, but of course my skills get better and sometimes my equipment too. This time I tried stacking with Regim instead of IRIS.

Stacked 30x30 second exposures of M42
Level of visible details looks better than any of my photos before. Colors on the other hand are a bit wrong. I think what's green there should be blue. I'll have to try IRIS for the stacking as well.

Update:

Looks like Regim used the wrong Bayer matrix for my raw photos. When I manually set the correct one, the colors look the way they should look.


...more or less. I'd still like some blue there. Even the single shots show some blue, so it's kind of strange the stack doesn't.

And one more:

The same again, but now with IRIS. Finally I got the blue color I missed.


Mikko's Nonexistent Comet and Identical Ghost Nebulae

Lately several of my astrophotos have had some sort of lens flares or other reflections. I've figured that they're from street lights or yard lights. After all I do most of my observations and photographs on my backyard. Usually these flares appear on the edge of photo so I won't have to worry about them. Couple of times they have surprised me though.

Mikko's Nonexistent Comet


I was taking a panorama of Cassiopeia. That panorama didn't work (not enough overlapping), but there was this "comet" on one of the images. I immediately checked the other images as well and realized what this was. There's a star in a very convenient place to make the flare look like comet's tail. The next image had the same flare but the star had moved away from it.

Identical Ghost Nebulae

I was testing whether I could photograph the Horsehead Nebula. I had the EQ-mount surprisingly well set. I could take 30 second exposures with 200mm, where I usually have to settle to 20 sec or less. Flare nebula was easily visible on camera screen so I started to take series of photos. Then I noticed this:


First of all, there shouldn't be anything like that on sky, at least on Orion. But now there's two identical! I was taking the photos on my balcony and there were some lights from neighbors that might find their way to my camera even though I had quite a long hood on the lens. I put some cardboard to block all light I could think of, but still the flares remained.

I zoomed and looked the image thoroughly and I saw a third one. Then I got it. Those flares weren't from lights around me but from the stars. The next image (click it larger if the small one doesn't show) explains it quite well. There are three flares and three bright stars. Moreover, the positions of the flares are exact π rotation of star positions.


The flares were caused by UV-filter I had on the lens. I read somewhere that the filter does not affect anyhow on stellar photography so I've kept it on the lens to cover it. Looks like I have to remove it from now on. Without it there were no flares.